Master Oven Caramelized Onions: The Ultimate Hands-Off Kitchen Hack
There’s an undeniable allure to caramelized onions. From their humble beginnings as pungent bulbs, they undergo a miraculous transformation, emerging as sweet, golden, and deeply flavorful culinary gems. This rich, savory-sweet addition elevates everything from gourmet burgers and creamy risottos to simple sandwiches and sophisticated tarts. The depth of flavor they bring is truly unmatched, making them a staple in many kitchens. However, the traditional stovetop method, with its constant stirring and watchful eye, can often feel like a culinary chore, demanding patience and precision that busy home cooks simply don't have.
But what if we told you there’s a simpler, more hands-off way to achieve this sweet perfection? Enter the oven – your secret weapon and the ultimate
kitchen hack to make caramelized onions in the oven. This comprehensive guide will demystify the art of caramelizing onions, providing you with a foolproof method that promises melt-in-your-mouth tenderness and irresistible flavor, all with minimal fuss. Get ready to unlock the secrets of oven caramelization and transform your cooking with this essential technique.
The Sweet Science: Understanding Caramelization in the Oven
Before we dive into the "how-to," let's briefly touch upon the "why." Caramelization is a fascinating chemical process that occurs when sugars are heated to high temperatures. As the onions slowly cook, their natural sugars break down and rearrange, forming hundreds of new flavor compounds. This process is responsible for the characteristic brown color, sweet aroma, and complex, nutty, and savory-sweet flavor profile that makes caramelized onions so addictive. Unlike the Maillard reaction, which involves proteins, caramelization specifically focuses on sugars, creating those deep, wonderful notes.
The oven provides a superior environment for this transformation compared to a stovetop. Its gentle, consistent, and even heat allows for a more controlled caramelization, reducing the risk of burning and minimizing the need for constant supervision. Several factors influence the success of this process:
*
Temperature: The ideal temperature range for caramelizing onions in the oven is between
250°F and 300°F (120°C and 150°C). A temperature too low will prolong the cooking time excessively and can result in soggy onions rather than beautifully browned ones. Conversely, too high a temperature can cause the sugars to burn before they've had a chance to fully develop their complex flavors, leading to bitterness.
*
Time: Patience is perhaps the most crucial ingredient. Caramelizing onions takes time – typically anywhere from 45 minutes to an hour, or even longer, depending on the volume of onions and the desired depth of caramelization. Rushing the process will only yield browned onions, not truly caramelized ones.
*
Sugar Content: Onions naturally contain varying amounts of sugar. While yellow and Vidalia onions are generally sweeter, adding a small amount of extra sugar, such as brown sugar, maple syrup, or honey, can accelerate the caramelization process and enhance their inherent sweetness.
*
Acidity: A touch of acidity, like a splash of balsamic vinegar or red wine, plays a dual role. It not only adds an extra layer of flavor but also helps to break down the onions' cell walls, facilitating a more even and thorough caramelization.
Your Essential Kitchen Hack: Make Caramelized Onions in the Oven
This method is truly a game-changer, turning a traditionally labor-intensive task into an effortless one. Here’s what you'll need and how to execute this brilliant
kitchen hack to make caramelized onions in the oven. For more detailed instructions and to understand how this method stands out, check out our guide on
Oven Caramelized Onions: The Easy Hands-Off Kitchen Hack.
Ingredients:
*
2-3 pounds yellow onions: These are the workhorses of caramelization, offering a perfect balance of sweetness and pungency. Spanish or Vidalia onions also work beautifully.
*
¼ cup olive oil: Provides a rich base and helps conduct heat evenly.
*
1 tablespoon unsalted butter (optional but recommended): Adds a creamy depth of flavor and aids in browning.
*
1 teaspoon salt: Essential for seasoning and drawing out moisture, which kickstarts the caramelization process.
*
½ teaspoon black pepper: For a subtle savory counterpoint.
*
¼ cup balsamic vinegar (optional): Enhances sweetness and adds a lovely tangy complexity towards the end. A splash of red wine or a pinch of brown sugar can also be used.
Equipment:
* A large oven-safe skillet (cast iron works wonderfully) or a deep baking dish (9x13 inch is ideal).
* Aluminum foil (optional, for covering).
Step-by-Step Guide to Oven Perfection:
1.
Preheat Your Oven: Set your oven to
300°F (150°C). This consistent, moderate heat is key to preventing burning and encouraging slow, even caramelization.
2.
Prepare the Onions: Peel the onions and slice them thinly and uniformly. Aim for slices that are about ¼ inch thick. Consistency in thickness is crucial for even cooking; thicker pieces will take longer to cook, while thinner pieces might burn.
3.
The Initial Sauté (Optional but Beneficial): In your large oven-safe skillet, heat the olive oil and butter (if using) over medium heat on the stovetop. Add the sliced onions, salt, and pepper. Sauté for about 5-10 minutes, stirring occasionally, until the onions soften slightly and become translucent. This step kickstarts the process, helping to break down the onions and release moisture, shortening the overall oven time slightly. If you're truly aiming for a completely hands-off approach, you can skip this step and add all ingredients directly to the baking dish, tossing well before placing in the oven.
4.
Transfer to Oven: If you sautéed, simply transfer the skillet directly to the preheated oven. If you skipped the sauté, combine onions, oil, butter, salt, and pepper in your baking dish, toss well, and cover loosely with aluminum foil (this traps initial moisture, helping them steam and soften before browning).
5.
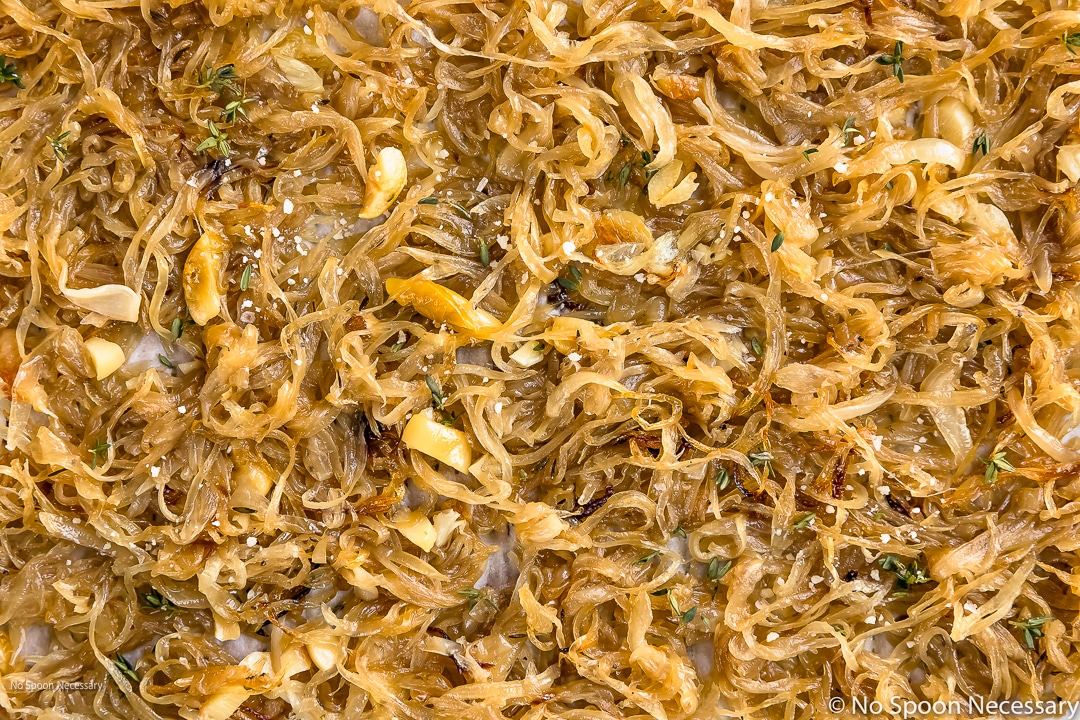
Bake and Stir: Bake for 45 minutes to an hour. After 30 minutes, remove the foil if using, and give the onions a good stir to ensure even exposure to the heat. Continue baking, stirring every 15-20 minutes, until the onions are deeply golden brown, incredibly soft, and sticky. The total time can vary from 1 hour to 1 hour and 30 minutes, depending on your oven and desired caramelization level.
6.
Adding the Finishing Touches (Optional): During the last 15-20 minutes of baking, if you’re using balsamic vinegar or another liquid, stir it into the onions. This adds an extra layer of flavor and helps deglaze any browned bits sticking to the pan, intensifying the overall taste. Continue baking until the liquid has evaporated and the onions are beautifully caramelized.
7.
Enjoy: Once the onions have reached your desired level of caramelization, remove them from the oven. They will be incredibly hot, so let them cool slightly before serving or storing.
Pro Tips & Troubleshooting for Flawless Results
Achieving perfect oven-caramelized onions is straightforward with this method, but a few expert tips can elevate your results even further. For a comprehensive guide on transforming onions with this method, consider our article on
Transform Onions: A Foolproof Oven Caramelization Guide.
*
Choosing the Right Pan: A heavy-bottomed, oven-safe skillet (like cast iron) or a substantial baking dish ensures even heat distribution and prevents hot spots that can lead to uneven browning or burning. Make sure the onions aren't too crowded; use two dishes if necessary.
*
Slicing Uniformity: We can't stress this enough – consistent slicing is the cornerstone of even caramelization. A mandoline slicer can be a great tool for achieving uniform thickness if you're comfortable using one.
*
The Power of Patience: Resist the urge to crank up the heat to speed things along. Caramelization is a slow dance, and rushing it will compromise the deep, complex flavors you're aiming for.
*
Dealing with Dryness: If your onions start to look too dry or are sticking excessively before they've fully caramelized, add a tablespoon or two of water, vegetable broth, or even wine. This will reintroduce moisture, loosen the onions, and allow them to continue cooking without burning.
*
Flavor Variations: Experiment with different liquids in the final stages. Red wine, sherry, or even a splash of apple cider can introduce unique flavor notes. Fresh herbs like thyme or rosemary can also be added for an aromatic boost.
*
Storage Savvy: Caramelized onions store beautifully! Allow them to cool completely, then transfer them to an airtight container and refrigerate for up to a week. For longer storage, freeze them in individual portions in an ice cube tray, then transfer the frozen cubes to a freezer-safe bag. They'll keep for several months and can be thawed quickly for instant flavor.
Elevate Your Dishes: Creative Uses for Caramelized Onions
Once you've mastered this
kitchen hack to make caramelized onions in the oven, you'll find endless ways to incorporate them into your cooking:
*
Gourmet Burgers & Sandwiches: A spoonful of sweet caramelized onions takes any burger or grilled cheese to the next level.
*
Pizza Topping: Pair them with goat cheese, bacon, or mushrooms for a sophisticated pizza.
*
Savory Tarts & Quiches: The perfect base or filling for a decadent tart.
*
Soups & Stews: Add a rich depth to French onion soup, beef stew, or even lentil soup.
*
Pasta & Risotto: Stir them into a creamy pasta dish or risotto for an umami boost.
*
Dips & Spreads: Blend them into a creamy dip or spread for crostini or crackers.
*
Omelets & Scrambles: A quick and flavorful addition to breakfast or brunch.
Conclusion
Transforming ordinary onions into extraordinary caramelized wonders has never been easier, thanks to this simple and effective oven method. By understanding the science of caramelization and employing a few smart techniques, you can achieve perfect results with minimal effort. This
kitchen hack to make caramelized onions in the oven truly frees up your hands and your stovetop, allowing you to enjoy the unparalleled flavor and versatility of these sweet, savory gems more often. So, preheat your oven, slice those onions, and get ready to elevate your culinary creations to new heights!